Hardening Windows 10 Based Kiosks
Today, kiosks have become popular business tools for many reasons, including improved customer interactions, quicker service, reduced manpower requirements, reduced operational costs and many more. However, the increase in the number of cyberattacks in the recent past has made it clear that businesses not careful enough can fall prey to such incidents. Cybersecurity threats have become far too common and attackers often come up with newer ways to target different types of business endpoints, and interactive kiosks are no exception.
In order to complete transactions being carried out by customers, these kiosks gather personal and sensitive user information, which makes them attractive targets for hacking and ransomware attacks.
As these kiosks display company/product/solution/service-related videos/information, it is very important to have proper control over the content they display.
42Gears offers a comprehensive set of features to remotely manage, lock down, and secure an entire device fleet. From deployment to patch distribution, remote OS updates to ensuring a secure browsing experience, the kiosk management capabilities offered by 42Gears' mobile device management solution take care of everything.
Introductions
Why Are Kiosks a Target For Cyber Attacks?
Kiosks are widely used in many industries, including banking, retail, hospitality and healthcare. Today, we see self-service kiosks, visitor management systems, digital signage screens, information kiosks, point of sale devices and ATMs everywhere. Not only do these kiosks allow businesses to reduce manual effort, drive revenue, and expedite checkout, but also provide enhanced customer experience. Kiosks are often assumed to be secure, probably because they are dedicated purpose devices. However, kiosks are highly susceptible to hacking as they are often placed on the same network as other business workstations, such as cash registers. This makes it very easy for hackers to get into the incredibly open networks they are connected to. Kiosks such as ATMs are unmanned stationary systems, which makes them an attractive target for hackers. In fact, a detailed Positive Industries report from 2018 indicates most ATMs can be hacked in under 20 minutes, if hackers employ certain types of attacks. Such attack scenarios include network attacks, kiosk mode deactivation, and card data theft.
According to one of the cybercrime statistics, "hacker attacks take place worldwide every 39 seconds, affecting one in three Americans each year." Many multi-billion dollar companies such as Uber, Quora, and LinkedIn have experienced highly complex and costly data breaches. This list also includes the Aadhaar Data breach incident in 2018, when the personal data of over a billion Indian citizens, including phone numbers, addresses, ID numbers, and other confidential information, were left exposed on the web.
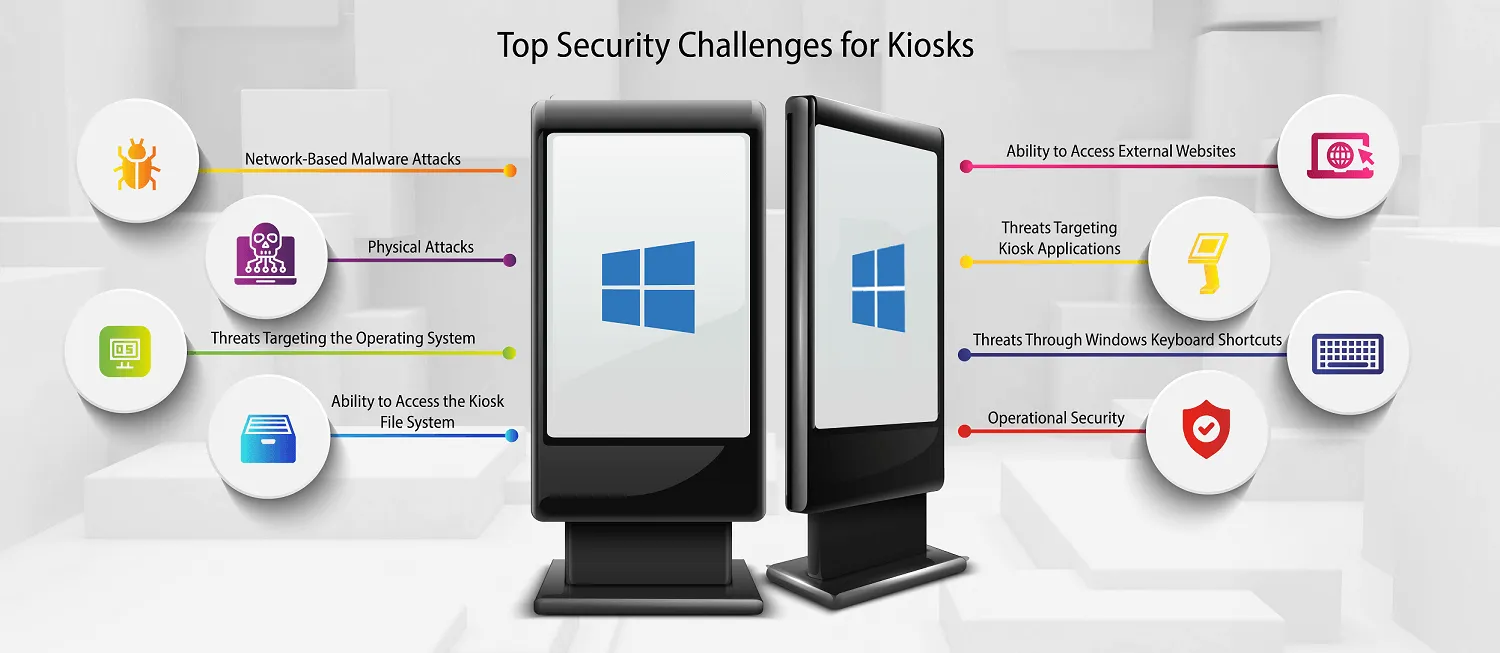
Top Kiosk Security Challenges
Kiosks are often prone to various risks such as ATM jackpotting, PIN theft, malware attacks, or exploitation of vulnerabilities in web applications, browsers, USB ports, and more. Standard security measures such as firewalls, antivirus, and encryption do not always provide enough protection from threats.
These risks can further be classified into various categories:
i. Physical Attacks
Portable drives and removable media, such as USBs, CDs, and hard drives, can make business data vulnerable. Large organizations employing contract workers for maintaining kiosks are at a greater risk because such workers may easily gain access to internal networks. When hackers have access to these devices, they can potentially load malware or viruses that can read the data on such kiosks and even hijack them.
ii. Network-Based Malware Attacks
There are various ways of distributing malware, such as spyware, trojans, and ransomware. For example, Malware can be launched through phishing mails that encourages the recipient to open an embedded link or attachment. From there, a hacker can introduce vulnerabilities into installed applications or submit unusual commands to retrieve private data from online databases (a process known as SQL injection). As device networks become more and more interconnected, the risk of network-based malware attacks grows more serious. Once the attackers enter a given network, they can install malicious code or applications to gain access to admin credentials, and from there, obtain full system access. Next, they can try to capture sensitive information by installing RAM scraping malware or network sniffing tools. Finally, they can exfiltrate the stolen information to cybercriminals by taking advantage of compromised FTP servers or web hosts.
iii. Threats Targeting the Operating System
Many dedicated-use kiosks in locations where maintenance is difficult (such as in remote, high-traffic tourist areas) run an old unpatched version of Windows. This saddles users with a slow and outdated interface and puts the kiosk at major risk of being compromised - yet because they still technically work, their owners do not feel the need to update them. Embedded systems, in particular, use outdated hardware and software. Devices running Windows 7 became an easy target for hackers in January 2020, when Microsoft ended support for Windows 7.
iv. Ability to Access the Kiosk File System
Hackers can get access to corporate resources, sensitive personal information or transaction-related information by illegal means such as privilege escalation, backdoors, rootkit, default accounts, and gateways such as unprotected access points. A kiosk running an unsecured web browser can allow a hacker to enter the file system of the kiosk by typing a file path into the browser's address bar.
v. Ability to Access External Websites
Businesses activate kiosk mode on web browsers to disable many functionalities, including the web address bar. However, a kiosk running a web browser may allow hackers to gain. However, hackers can easily come out of the kiosk mode on most browsers by pressing the shift key and clicking on a hyperlink, which will open the link in a new browser window, usually with the address bar enabled.
vi. Threats Targeting Kiosk Applications
The applications installed on the kiosk are also vulnerable to different kinds of attacks. For example, many companies use visitor management systems, which are nothing but digital sign-in portals, in order to greet visitors at businesses and facilities. Companies purchase visitor management software and set it up on PCs or mobile devices like tablets. These systems can leak information through various ways such as periods of inactivity or shutdown, or would allow an attacker to run an application as a non-privileged user by to plant malware or access data.
vii. Threats Through Windows Keyboard Shortcuts
Kiosks that have a physical keyboard can pose a serious security threat. Admins must lock down the Function keys of a keyboard (such as Esc, Alt, Ctrl, Windows, Del, Start Menu, PgDn, Print Screen, etc.) to prevent users from misusing the keyboard for malicious purposes. For example, using the keyboard, kiosk users could access the Start menu and navigate out of kiosk mode.
viii. Operations Security
If companies do not regularly monitor and patch their kiosks, this can lead to a security breach that exposes buyers' payment data.
Benefits of Hardening Kiosks with 42Gears Kiosk Management Solution
- Easy remote maintenance lowers operating costs
- Remote access to end-user devices minimizes device downtime
- Dedicated device functionality enhances customer experience
How 42Gears Can Help
I. Solution to Physical Attacks
A. Encryption
Microsoft provides an easy-to-use encryption program built into Windows called BitLocker. Bitlocker is an effective tool that can encrypt the entire PC hard drive, including the system drive, any physical drive, or even a virtual hard drive (VHD) of a Windows 10 PC. BitLocker also prevents unauthorized access to the system and protects PC data in case the device is lost or stolen.
IT admins can remotely enable BitLocker on Windows 10 kiosks through SureMDM.
- Login to the 42Gears SureMDM Web Console.
42Gears SureMDM allows IT admins to run customized Run Scripts on the enrolled Windows devices which block access to USB drives or other portable devices.
- Go to Profiles.
- Select Windows and click Add.
- Select BitLocker from the list of profiles and click Configure.
- Name the profile.
- Select Require from the Encrypt Devices dropdown menu.
- Under BitLocker base settings, choose the appropriate options for the following settings:
- Warning For Other Disk Encryption – This allows you to disable the warning prompt for other disk encryption on devices.
- Configure Encryption Methods – This defines the encryption methods to be used for specific drive types. If this is Not Configured, the BitLocker wizard will ask the user for the encryption method to be used on a drive type. The encryption method for all drives defaults to XTS-AES 128-bit while the encryption method for removable drives defaults to AES-CBC 128-bit. If this is On, BitLocker uses the encryption method specified in the policy. Also, if On, these extra settings appear. Choose the default encryption method for each drive type.
- Operating system drive
- Fixed drive
- Removable drive
- Under BitLocker OS drive settings, choose appropriate options for the following settings:
- Additional Authentication at Startup – This defines the additional authentication required during device startup. It also specifies whether BitLocker should be allowed on devices that don't have a TPM (Trusted Platform Module Technology Overview) chip. If this is Not Configured, devices without a TPM chip cannot use BitLocker encryption. If this is On, the following extra settings appear.
- Minimum PIN Length – This denotes the minimum length of the TPM startup PIN.
- OS Drive Recovery – If the unlocking step fails, BitLocker prompts the user to enter the configured recovery key. This setting configures the operating system drive recovery options available to users if they don't have the unlock password or USB startup key.
- Pre-Boot Recovery Message and URL – This specifies whether BitLocker shows a customized message and URL on the recovery screen. If it is On, the following extra settings appear. If this is Not Configured, the default recovery message and URL display.
- Use default recovery message and URL
- Use empty recovery message and URL
- Use custom recovery message
- Use custom recovery URL
- Under BitLocker fixed data-drive settings, choose from the following:
- Write Access To Fixed Data – Drive Not Protected By BitLocker Fixed Drive Recovery – If not Blocked, users can write to fixed drives only when those drives are encrypted with BitLocker.
- Under BitLocker removable fixed data-drive settings, choose from the following:
- Write Access To Removable Data – Drive Not Protected By BitLocker – If this is On, users can write to removable drives only when those drives are encrypted with BitLocker. Configure this setting based on your organization's policy to allow write access on any unauthorized removable drives.
- Once the configuration is complete, click Save.
- Now, go to Home.
- Select the desired Windows 10 device from the device list and click Apply.
- Select the saved Profile and click Apply.
Bitlocker with the desired settings will be pushed to the selected Windows 10 device(s).
A. Encryption
To create a job with customized scripts and deploy it to the enrolled device(s) or group(s) remotely, follow these steps:
- Navigate to SureMDM Web Console > Jobs > New Job > Windows > Run Script.
- In the Run Script prompt, enter a Job Name and Script and click Save.
or
To add a predefined script in the Script box, follow these steps:
- Click a setting displayed on the left panel.
- Disable USB for Windows device
- Enable BitLocker Run Script support on Windows 8 and 10
- Select Execute in the currently logged-in user account to deploy the job on the currently logged-in user on the device and click Save.
A Run Script will appear on the screen.
- Configure the script if required and click Validate.
A confirmation of successful validation will be displayed.
- Click Insert.
The Run Script will be inserted in the box.
- Click Save.
The newly created job will be listed under the Jobs List section.
- Click a setting displayed on the left panel.
- Go back to Home and select the Windows device(s) or group(s).
- Click Apply to launch the Apply Job/Profile To Device prompt.
- On the Apply Job/Profile To Device prompt, select the job and click Apply.
II. Solution to Network-Based Malware Attacks
Companies can secure networks that serve critical infrastructure by configuring devices to connect to only approved Wi-Fi settings.
A. Send Patches to Windows Devices
One essential step towards preventing any malware attack via network is to patch devices from time to time. Keeping devices and applications updated limits the risk of the network becoming a liability.
Admin can schedule Windows updates remotely for enrolled kiosks using Windows Updates profile.
To schedule Windows updates remotely on enrolled kiosks, follow these steps:
- Navigate to SureMDM Web Console > Profiles > Windows > Add > Windows Updates > Configure.
- Enter a Profile Name.
- Configure the desired Windows Updates Settings and click Save.
| Settings | Description |
|---|---|
| Auto Update Behavior | Select an option from the following to manage automatic update behavior:
|
| Windows Update Source | Select a Source from the following options to know from which branch the updates are from:
|
| Allow Update Service | Allow updates from public Windows Update service. |
| Allow Microsoft Updates | Allow all updates from Microsoft. |
| Pause Feature Updates | Allow pausing of feature updates for up to 60 days. |
| Pause Quality Updates | Allow pausing of all quality updates. |
| Exclude Windows Driver Updates | Exclude Windows driver updates during the updates. |
| Update Scan Frequency In Hours | Select a scan frequency (up to 22 hours). |
| Defer Feature Update Period In Days | Select the number of days to delay feature updates. |
| Defer Quality Update Period In Days | Select the number of days to delay quality updates. |
| Configure Feature Update Uninstall Period | Select a value for the uninstall period for feature updates. |
| Restart Checks | Skip all restart checks and ensure that reboot happens at a scheduled time. |
| Approval to Restart | Select an option from the following to dismiss the warning notification to reboot:
|
| Restart Warning with Dismissible Reminder | Select the period to display auto-restart warning reminder notification. |
| Restart Warning with Permanent Reminder | Select the period to display auto-restart imminent reminder notification. |
| Engaged Restart Deadline for Quality Updates | Select the deadline in days before automatically scheduling and executing a pending restart outside active hours. |
| Snooze Engaged Restart Reminder for Quality Updates | Select the number of days a user can snooze the restart reminder notification. |
| Engaged Restart Transition Schedule for Quality Updates | Select the time before transitioning from auto-restart is scheduled outside the active hours. |
| Active Hours Start Time (0-23 Hours) | Enter the start time of active hours during which the system cannot reboot. |
| Active Hours End Time (0-23 Hours) | Enter the active hours where update reboots are not scheduled. |
| Active Hours Maximum Range | Select a value for maximum active hour range. |
| Allow Auto Windows Updates To Be Downloaded Over Metered Network | Allow the system to download Windows updates automatically over metered connections. |
| Allow Non Microsoft Signed Update | Allow IT admins to manage automatic updates signed by entities other than Microsoft when the update is found at UpdateServiceUrl location. |
| Auto Restart Deadline Period In Days | Select the deadline period (in days) for maximum active hours. |
| Auto Restart Deadline Period In Days for Feature Updates | Select the deadline period (in days) before automatically executing a scheduled restart outside of active hours. |
| Schedule Auto Restart Notification | Select the period to display auto-restart reminder notification. |
| Defer Update Period In Weeks | Select the period (upto 4 weeks) to delay the updates. |
| Defer Upgrade Period In Months | Select the period (up to 8 months) to delay the additional upgrades. |
| Engaged Restart Deadline for Feature Updates | Select the deadline in days before scheduling automatic feature updates and executing a pending restart outside of active hours. |
| Engaged Restart Snooze Schedule For Feature Updates | Select the number of days a user can snooze the engaged restart reminder notification for feature updates. |
| Engaged Restart Transition Schedule for Feature Updates | Select the time before transitioning from auto-restart is scheduled outside the active hours for feature updates. |
| Exclude Windows Update Drivers In Quality Updates | Exclude Windows driver updates during the updates. |
| Fill Empty Content URLs | Allow Windows Update Agent to determine the download URL when it is missing from the metadata. |
| Ignore MO App Download limit | Ignore the MO download limit (allows unlimited downloading) of apps and their updates over a cellular network. |
| Ignore MO Update Download Limit | Ignore the MO download limit (allows unlimited downloading) of OS updates over a cellular network. |
| Schedule Install Every Week | Schedule update installation every week. |
| Schedule Install on the First Week of the Month | Schedule update installation for the first week of the month. |
| Schedule Install on the Second Week of the Month | Schedule update installation for the second week of the month. |
| Schedule Install on the Third Week of the Month | Schedule update installation for the third week of the month. |
| Schedule Install on the Fourth Week of the Month | Schedule update installation for the fourth week of the month. |
| Disable Pause Update Access | Disable the Pause Updates features. |
| Remove Access to Scan Window Updates | Remove access to scan the Windows updates. |
| Manage Preview Builds | Select an option from the following to manage Windows 10 Insider preview builds:
|
| Defer Upgrade | Select an option from the following to delay the upgrades:
|
| Schedule Install Day | Select the day to schedule the update installation. |
| Update Notification Level | Allow IT admins to define which Windows update notification users can see. Choose an option from the following:
|
| Update Service URL | Allow the device to check for updates from the WSUS server instead of Microsoft Updates. |
| Alternate Update Service URL | Enter an alternate intranet server to host updates from Microsoft update. |
| Allowed Peer-To-Peer Method | Choose a download method that delivery optimization can use in downloads of Windows Updates, Apps and App Updates
|
| Limit Peer Usage To Member With the Same Group ID | Choose the Source from the following to restrict peer selection:
|
| Maximum Time Each File Is Held In The Delivery Optimization Cache (Seconds) | Select the time in seconds for which each file should be held in the delivery optimization cache after downloading successfully. |
| Maximum Cache Size That Delivery Optimization can Utilize (%) | Select a value for maximum cache size (up to 100%) that delivery optimization can utilize. |
| Maximum Upload Bandwidth That A Device Will Use Across All Concurrent Upload Activity (KB/sec) | Select a value for maximum upload bandwidth (in KB/sec) that a device will use across all concurrent upload activity using delivery optimization. |
| Minimum Battery Required For Peer Uploads (%) | Select a value (up to 100%) to allow the device to upload data to LAN and group peers while on battery power. |
| Maximum Allowed Cache Size (GB) | Select a value for maximum value (in GB) of the delivery optimization cache. |
| Minimum Disk Size For Device To Use Peer Caching | Select a value for minimum disk size (in GB) for the device to use peer caching. |
| Minimum RAM For Device To Use Peer Caching (GB) | Select a value for minimum RAM size (in GB) for peer caching. |
| Minimum Content File Size That Can Use Peer Caching (MB) | Select a value for minimum content file size (in MB) to use peer caching. |
| Minimum Download Bandwidth That A Device Will Use (KB/Second) | Select a value for maximum download bandwidth (in KB/sec) that the device can use across all concurrent download activities using delivery optimization. |
| Maximum Download Bandwidth As A Percentage of Total Available (%) | Select a value for maximum download bandwidth (in %) that delivery optimization can use across all concurrent download activities as a percentage of available download bandwidth. |
| Minimum QoS For Background Downloads (KB/Second) | Select a value for minimum download QoS (Quality of Service or Speed) in KB/sec for background downloads. |
| Monthly Upload Data Cap (GB) | Select a value for the monthly data cap (in GB) that delivery optimization is allowed to upload to internet peers in each calendar month. |
| VPN Peer Caching | Allow the device to participate in peer caching while connected via VPN to the domain network. |
| Drive Location Used For Peer Cache | Specify the drive location that delivery optimization should use for its cache. |
The newly created profile will be listed under the Profiles section.
- Go back to the Home tab and select the Windows device(s) or group(s).
- Click Apply to launch the Apply Job/Profile To Device prompt.
- On the Apply Job/Profile To Device prompt, select the created profile and click Apply.
Companies can secure networks that serve critical infrastructure by configuring devices to connect to only approved Wi-Fi settings.
B. Two Factor Authentication through Windows Hello
Windows Hello is a secure way to get instant access to Windows 10 devices using biometric gestures (fingerprint/facial recognition) or PIN gestures. This profile allows admins to configure fingerprint/facial recognition or set a PIN on enrolled devices that helps users get access to applications, websites, and networks.
Note: This profile only applies to Windows 10 devices that are enrolled through Windows EMM or Dual Enrollment processes.
To configure fingerprint/facial recognition or set a PIN on enrolled device(s), follow the steps below:
- Navigate to the SureMDM Web Console > Profiles > Windows > Add > Windows Hello > Configure.
- Enter a Profile Name.
- Configure Windows Hello settings and click Save.
| Settings | Description |
|---|---|
| Windows Hello | Allow the use of Windows Hello for business. |
| Use Biometrics | Allow the use of biometric gestures such as fingerprint or face recognition instead of PIN gestures. |
| TPM | Enable this option to disable TPM (Trusted Protection Module revision 1.2) from using Windows Hello profile. |
| Minimum PIN Length | Enter the minimum number of digits for setting a PIN. |
| Maximum PIN Length | Enter the maximum number of digits for setting a PIN. |
| Digits | Set the usage of digits (Allowed/Required/Not Allowed). |
| Upper Case Letters | Configure the use of upper case letters (Allowed/Required/Not Allowed). |
| Lower Case Letters | Configure the use of lower case letters (Allowed/Required/Not Allowed). |
| Special Characters | Configure the use of special characters (Allowed/Required/Not Allowed). |
The newly created profile will be listed under the Profiles section.
- Go to the Home tab and select the Windows device(s) or group(s).
- Click Apply to launch the Apply Job/Profile To Device prompt.
- On the Apply Job/Profile To Device prompt, select the created profile and click Apply.
III. Prevents threats to the Operating System of Kiosk
You can create an OS Update job in SureMDM that allows IT admins to remotely update enrolled device(s) to the latest version of the OS.
To create a job to update the OS on enrolled device(s) or group(s) remotely, follow these steps:
- Navigate to the SureMDM Web Console > Device Grid.
- Select a Windows device and click OS Updates from the Dynamic Jobs section.
Note: The device needs to be enrolled with Windows EMM in order for the OS Updates option to appear.
This will list all the updates available for the device.
- Go to Jobs > New Job > Windows > OS Updates.
This will list all the updates available for all the devices.
- Enter a Job Name and select the required updates from the list and click OK.
The newly created job will be listed under the Jobs List section.
- Go back to the Home tab and select the Windows device(s) or group(s).
- Click Apply to launch the Apply Job/Profile To Device prompt.
- On the Apply Job/Profile To Device prompt, select the job and click Apply.
IV. Prevent Access to the Kiosk File System
Access to a kiosk's file system can be restricted in the following ways:
A. Launch Applications in a Kiosk Mode or Use Kiosk Browsers Like SureFox
It is easy to launch applications locked in kiosk mode, popularly referred to as single application mode. This ensures that attackers do not have access to the file system of a kiosk. Single Application Mode refers to a mode in which the Windows device runs only one allowed application/website all the time.
Whitelisting applications is very effective and provides protection against malware in ways that antivirus software cannot. When a list of entities are whitelisted on a system, the authorized baseline set in the system restricts it from running any program or code which is outside the authorized set.
To enable Single Application Mode, follow the steps below:
- Access SureLock Settings.
- On the main Menu screen, tap SureLock Settings.
- On the SureLock Settings screen, tap Single Application Mode.
- On the Single Application Mode Settings screen, tap the Single Application Mode option.
- Tap Done to complete.
This feature can be enabled only if one application/website is allowed on the SureLock Home Screen. If that application requires another application to run, enable Hide Icon on Home Screen option to hide the other application.
B. Push group policies to disable access to external media through SureMDM
Enter the following Run Script to disable USB storage:
reg add "HKLMSYSTEMCurrentControlSet?ServicesUSBSTOR" /v "Start" /t REG_DWORD /d "4" /f
Enter the following Run Script to deny all access to RemovableStorageDevices:
!#suremdm policy SOFTWAREPoliciesMicrosoftWindowsRemovableStorageDevices Deny_All 1
Enter the following Run Script to block read access for Removable Disks:
!#suremdm policy SOFTWAREPoliciesMicrosoftWindowsRemovableStorageDevices{53f5630d-b6bf-11d0-94f2-00a0c91efb8b} Deny_Read 1
Enter the following Run Script to block write access for Removable Disks:
!#suremdm policy SOFTWAREPoliciesMicrosoftWindowsRemovableStorageDevices{53f5630d-b6bf-11d0-94f2-00a0c91efb8b} Deny_Write 1
Enter the following Run Script to deny Read access for CD-ROMs:
!#suremdm policy SOFTWAREPoliciesMicrosoftWindowsRemovableStorageDevices{53f56308-b6bf-11d0-94f2-00a0c91efb8b} Deny_Read 1
Enter the following Run Script to disable Write access for CD-ROMs:
!#suremdm policy SOFTWAREPoliciesMicrosoftWindowsRemovableStorageDevices{53f56308-b6bf-11d0-94f2-00a0c91efb8b} Deny_Write 1
Enter the following Run Script to deny execute access for CD-ROMs:
!#suremdm policy SOFTWAREPoliciesMicrosoftWindowsRemovableStorageDevices{53f56308-b6bf-11d0-94f2-00a0c91efb8b} Deny_Execute 1
Enter the following Run Script to restrict users' access to hidden folders:
!#suremdm policy SOFTWAREMicrosoftWindowsCurrentVersionPoliciesExplorer NoFolderOptions 1
V. Prevent Access to External Websites
Access to external websites can be easily blocked through SureFox and SureLock. 42Gears SureFox allows IT admins to add, edit or remove a list of URLs so users can browse only allowed websites. This functionality locks down the web browser and allows enterprises to organize the list of allowed websites into categories.
To add a URL from SureLock, follow the steps below:
- Access SureLock Settings.
- On the Main Menu screen, tap Allowed Websites.
- On the Allowed Websites screen, tap Add URL to launch a Website Information prompt.
The Website Information prompt has the following customization options:
- Type - URL Type (http/https/file)
- URL - Enter the URL
- Display Name - Enter the Display Name
- Icon - This is the icon image for the website. Select the Icon as Favicon/Default.
- Allow Subdomains - Select this option if the user wants to allow all the subdomains of the allowed URL. For example, if www.google.com is selected as the allowed URL, then allowing the sub-domains will provide access to all sites hosted under *.google.com such as maps.google.com, mail.google.com and so on.
- Allow Only This Page – Select this option if the user wants to allow any specific webpage.
Note: Allow subdomains does not allow sites with the same domain name but with different extensions, such as google.co.in or google.co.uk. They will have to be allowed as a separate URL. This option can be selected only when the Allow subdomains option is disabled.
- Set as Starting URL - The selected URL will be set as the home page and will automatically load on launching SureLock.
- Hide URL - If the Hide URL option is selected, the allowed URL will be hidden from the homepage but will not be blocked. This option is quite useful in case admins don't want to directly launch the website but need to ensure that it is accessible when launched by other allowed sites.
- Error Redirection - Select this option to redirect any network error to this page. It allows you to display a custom error page if any site is down due to a network problem.
Note: Only one site can be set as the Error Redirection page at a time.
- Tap Save to complete.
The allowed URL will get displayed on the SureLock Home Screen.
VI. Application Security
A. Enable Idle Timeout for Application/Website
Businesses can secure applications by enabling SureLock's Idle Timeout for Application/Website option. Select Idle Timeout Application/Website option to redirect the device screen automatically to an application/website instead of the SureLock Home Screen if the device is inactive for some time.
To set an Idle Timeout Application/Website in SureLock, follow the steps below:
- Access SureLock Settings.
- On the main Menu screen, tap SureLock Settings.
- On the SureLock Settings screen, tap Timeout Settings.
- Tap Idle Timeout Application/Website to launch a prompt with a list of all Allowed Applications/Websites.
- Tap the application/website to use as the Idle Timeout Application/Website.
- Tap Close to complete.
B. Run the Application as a Non-Privileged User or an Administrator
Another way to secure applications is to enable the option to 'run the application as an administrator' provided by SureLock. This option can also be enabled through the SureMDM console.
To add an allowed application(s), follow these steps:
- Access SureLock Settings.
- On the main Menu screen, tap Allowed Applications.
- On the Allowed Application screen, tap Add Application to launch the Application Information prompt.
The Application Information prompt has following customization options:
- Application Name - Name the application.
- Path - Browse for the application from the folder location.
- Parameter - Specify if any parameters are to be used. Example - k for Kiosk browsing in Internet Explorer.
- Working Directory – Browse the path of the folder with ready-to-run applications on the SureLock Home Screen without error.
- Icon - Choose the icon image for the allowed application.
- Launch at Startup - Start the application as soon as SureLock loads.
- Hide Icon on Home Screen - Hide the application's icon on the Home Screen.
- Run as Administrator - Run the application as an administrator.
- Pin to taskbar - Pin the application to the taskbar.
- Tap Add Application to complete.
The allowed application(s) will get displayed on the SureLock Home Screen.
Creating an Application Policy allows admin to remotely install apps on enrolled devices.
To create a profile to install an application on enrolled device(s), follow these steps:
- Navigate to the SureMDM Web Console > Profiles > Windows > Add > Application Policy > Configure.
- Enter a Profile Name and click Add.
- On the Add App prompt, select App Name from the drop-down menu.
For the applications to list under the App Name drop-down menu, the apps have to be added to the Windows store. To add apps to Windows store, see App Store for Windows.
- Click Add > Save.
The newly created profile will be listed under the Profiles section.
- Go back to the Home tab and select the Windows device(s) or group(s).
- Click Apply to launch the Apply Job/Profile To Device prompt.
- On the Apply Job/Profile To Device prompt, select the created profile and click Apply.
Configuration Profile allows admin to remotely configure application settings on enrolled devices.
To configure application settings remotely on enrolled devices, follow these steps:
- Navigate to the SureMDM Web Console > Profiles > Windows > Add > Configuration Profile > Configure.
- Enter a Profile Name and click Add.
- Configure the Application Configuration settings and click Add > Save.
| Settings | Description |
|---|---|
| App Name | Enter the Application Name. |
| Package Name | Enter the Package Name of the application. |
| Key | Enter the Key. |
| Value | Enter the script (in XML code) to configure the app settings. |
The newly created profile will be listed under the Profiles section.
- Go back to the Home tab and select the Windows device(s) or group(s).
- Click Apply to launch the Apply Job/Profile To Device prompt.
- On the Apply Job/Profile To Device prompt, select the created profile and click Apply.
VII. Prevent Access to Windows Keyboard Shortcuts
42Gears SureLock solution protects kiosks by creating new shortcut keys for allowed application(s). To enable Windows Keyboard Shortcuts, follow the steps below:
- Access SureLock Settings.
- On the main Menu screen, tap Peripheral Settings.
- On the Peripheral Settings screen, tap Keyboard Settings.
- On the Keyboard Settings screen, tap Configure Keyboard Shortcuts.
- On the Keyboard Shortcuts Configuration screen, tap Add Key (this works when applications are allowed in SureLock)
- On the Keyboard Shortcut prompt, select the option from the following:
- Existing Key – Create a shortcut with the basic function keys.
- Select the desired function key from the Key drop-down menu.
- Select the desired Modifier.
- Select the Application for which the shortcut key needs to be configured.
- Custom Key – Create a shortcut with the desired combination of keys.
- Enter the Name of the shortcut key.
- Enter the Scan Code (value should be in hexadecimal).
- Select the desired Modifier.
- Select the Application for which the shortcut needs to be configured.
- Tap Add to complete.
- Existing Key – Create a shortcut with the basic function keys.
The newly created shortcut key will get listed on the Keyboard Shortcuts Configuration screen.
Note: The user has the option to edit and remove the shortcut keys using Edit Key and Remove Key.
VIII. Operations Security
Businesses can use SureMDM's Compliance Job to regularly monitor kiosks automatically. Compliance jobs can help configure compliance rules based on device health attestation and proactively trigger specified measures like blacklisting non-compliant devices or wiping data off a device (when required). This job allows admins to set alerts and notifications on detection of such vulnerabilities.
To create a Compliance Job and remotely deploy it to enrolled device(s) or group(s) in SureMDM, follow the steps below:
- Navigate to the SureMDM Web Console > Jobs > New Job > Windows > Compliance Job.
- On the Compliance Job prompt, enter a Job Name and select Enable Compliance Job.
- Select the option mentioned below to create compliance rules and click Configure.
- Windows Health Attestation - Compliance rule based on device health attestation values
- Configure Compliance Rules, and under Out of Compliance Actions, select the appropriate action you want to take (from the following) when the compliance rules are violated:
- Send Message
- Move to Blacklist
- Wipe the Device
- Email Notification
- Apply Job
- Send SMS
- Click Add Action to add additional Out of Compliance Actions.
- Click Save.
The newly created job will be listed under the Jobs List section.
- Go back to the Home tab and select the Windows device(s) or group(s).
- Click Apply to launch the Apply Job/Profile To Device prompt.
- On the Apply Job/Profile To Device prompt, select the job and click Apply.
Conclusion
As we continue to explore the benefits of using kiosks as business tools, we also need to think about making them more secure. A few security incidents that have happened in the recent past have led us to believe that these interactive kiosks can be quite vulnerable and attackers know this very well.
By ensuring that kiosks are always well-maintained and up-to-date, businesses can lower outage costs and increase customer satisfaction.
Managing kiosks using 42Gears' offerings offers businesses a robust way to secure kiosks. Licenses of SureMDM include access to both SureLock and SureFox, although SureLock and SureFox can also be purchased separately. Enterprises can choose one that best suits their needs.
Looking for a reliable and robust lockdown solution for your Windows kiosk devices? Try SureMDM by 42Gears or SureLock for Windows Kiosks.
To learn more about SureMDM and SureLock, or to download a free trial, please visit www.42Gears.com.
- https://media.kaspersky.com/en/business-security/enterprise/Kaspersky-Challenges-Facing-Embedded-Systems-Security-whitepaper-en.pdf
- https://securelist.com/it-threat-evolution-q3-2019-statistics/95269/
- https://securelist.com/darkvishnya/89169/
- https://medium.com/@redswimmer/kiosk-hacking-8-tips-to-improve-your-kiosk-security-e4214127639c
- https://www.olea.com/news/kiosks-help-ward-off-cybersecurity-threats/
- https://www.securityinformed.com/insights/self-service-kiosks-target-cyber-attacks-physical-security-co-1540547340-ga.1543319929.html
- https://threatpost.com/visitor-kiosk-bugs/142433/