

Businesses are increasingly embracing virtual reality as a powerful tool to transform processes, such as marketing, customer services, training and logistics. It opens new possibilities for businesses to market their products and services to the millennial customers, who prefer to look and feel the physical product. Simulation-based training for surgeons in VR headsets allows them to get a hands-on experience to new tools and procedures without actually risking a life.
42Gears recently added remote support, management and lockdown capabilities for Oculus Go and Quest VR headsets. The UEM agent for VR from 42Gears is called SureMDM Nix VR. These functionalities can help IT Pros to easily install 42Gears UEM Nix Agent on the VR devices, convert them into purpose-built devices, deploy useful applications through static and dynamic jobs and transfer files on the device.
NOTE: These steps are for Oculus Android VR Devices (Oculus Go and Oculus Quest).
How to get started?
1. Get the settings file from here.
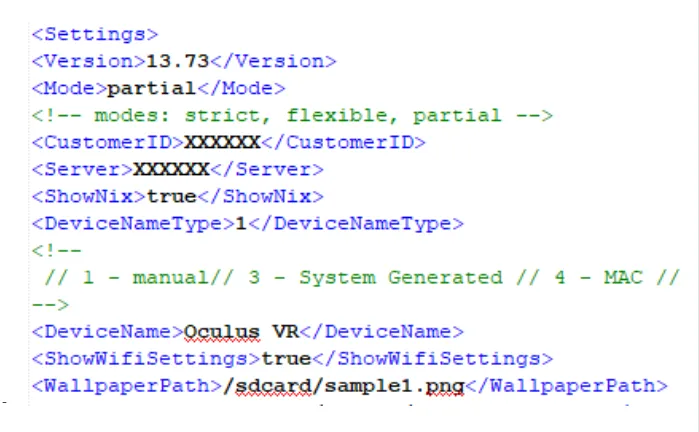
2. In the xml file, replace the following default values with your own:
- Customer ID will be the Account ID. (For example : Customer ID – 853245)
- Server – suremdm.42gears.com (Console URL to which the devices will be enrolled)
- DeviceName (Unique name for the VR device getting enrolled. This name will be the identity of the device in SureMDM Web Console for the Admin)
- Show Nix – True (To show the online status of SureMDM Nix in the SureMDM NixVR Application)
3. xml file has to be saved in SD Card of the VR device for enrollment. The users must use below-mentioned adb command to transfer NixSettings.xml file on the device SD Card:
adb push
4. Once, the above mentioned steps are completed, you can install SureMDM Nix VR Agent on Oculus VR devices.
NOTE: To learn how to Install ADB on Windows, macOS, and Linux, click here and to learn how to enable ADB (Developer mode) in VR oculus device to transfer Nix agent and nix setting file click here.
Install SureMDM Nix VR on Oculus VR devices
Follow the steps below to install SureMDM Nix VR Agent on Oculus VR devices:
1. Download SureMDM Nix VR Agent from 42Gears Download Page and install it on the device with the help of following ADB Command:
adb install
NOTE:
i. If the admin wants to grant all the Run time Permission, they can use the following adb command:
adb install –g
ii. Storage permission is mandatory for Nix Agent to work on the VR device. This permission will allow Nix Agent to read the settings file placed in SD card.
iii. Device Owner should be enabled for SureMDM Nix on the device. Set SureMDM Nix VR as Device Owner using the following adb command:
adb shell dpm set-device-owner com.nix.vr/com.nix.NixDeviceAdmin
2. After successful installation, click Library on the VR device with the help of the controller.
3. Click Unknown Sources.
4. Select SureMDM Nix VR from the drop-down option.
5. When SureMDM Nix VR Agent is launched, allow all Runtime Permissions.
NOTE: If runtime permissions are already granted, prompt for allowing permissions will not appear here.
SureMDM Nix Home Screen will be displayed.
After this step, SureMDM Nix VR Agent will automatically import NixSettings.xml file from SD Card and enroll the device to SureMDM Web Console.
6. Once enrollment is complete, SureMDM Nix will be seen online on the right side of VR screen.
Now, on SureMDM Web Console, in the Device Grid, you will see the enrolled VR device listed. The Android Enterprise Status for this device will show as Device Owner.
Enable or Disable Kiosk Mode on Oculus VR devices
Follow the steps below to enable or disable kiosk mode on Oculus VR devices:
NOTE: Setting SureMDM Nix Agent as the Device Owner is mandatory for Kiosk Mode to work. Refer to step no. 3 under Install SureMDM Nix VR on Oculus VR devices subtopic to learn how to set SureMDM Nix Agent as the Device Owner.
1. Navigate to SureMDM Web Console.
2. Select the device, right-click and select SureLock.
3. Click Enable Kiosk to lock down the device into kiosk mode.
4. Click Disable Kiosk to disable kiosk mode on the device (Disable Kiosk Mode option will be displayed only if kiosk is enabled already).
NOTE: When Disable Kiosk option is selected, the user can exit from SureMDM Nix.
You can also use Run Script Job in SureMDM to enable or disable Kiosk Mode on multiple devices at once.
Run Script to enable Kiosk Mode:
!#suremdm
startKiosk
Run Script to disble Kiosk Mode:
!#suremdm
disableKiosk
Whitelist apps on SureMDM Nix VR
There are two ways through which IT pros can whitelist applications on SureMDM Nix VR:
- Static Job
- Dynamic Job
Using Static Job:
1. Navigate to Jobs > Android VR > SureLock Settings.
2. In the SureLock Settings prompt, enter Single package name or Multiple package names separated by commas in the source field.
Example: com.netflix.ninja.vr,com.samsung.vrvideo,com.oculus.mediagallery
3. Enter a Job name and click OK to save the job.
4. Go to SureMDM Home.
5. Select Android VR device and apply the saved SureLock Settings Job to the device.
6. On successful completion of job, whitelisted applications will be visible on the SureMDM Nix VR.
Using Dynamic Jobs:
1. Go to SureMDM Home, select the Android VR device and click SureLock Settings job located at the top right of the console.
2. Enter Single package name or Multiple package names separated by a comma in the field and click OK.
Example: com.netflix.ninja.vr, com.samsung.vrvideo,com.oculus.mediagallery
Transfer Files on Oculus VR devices
There are two ways through which IT pros can transfer files on SureMDM Nix VR:
- Using File Transfer Job
- Using Remote Support
Using File Transfer Job:
1. Click Jobs and select Android VR.
2. Click File Transfer.
3. Click Add.
4. Select the file path or enter the File URL and click OK.
5. Enter a Job Name and click OK.
6. Go to SureMDM Home and apply the job to the device.
NOTE: When Enable USB debugging to install SureMDM Nix VR application on the devices.
Using Remote Support:
1. Go to SureMDM Home, select the Android VR device and click Remote job located at the right of the console (Dynamic Jobs section).
Remote session will be launched in a new window.
2. On the File Explorer section, click Upload to browse and select the desired file for transfer and click
Setting a Wallpaper on Oculus VR devices
There are two ways through which IT pros can set wallpaper on the device:
- Using Nix Settings File
- Using File Transfer and Runscript Jobs
Using Nix Settings File:
1. In Nix Settings file, add wallpaper path in the Wallpaper tag as mentioned below and save it.
Example:
2. Install SureMDM Nix VR on the device.
SureMDM Nix VR will be installed on the device with the wallpaper.
or
Push new Nix setting file to the device using File Transfer Job and reboot the device.
SureMDM Nix VR will be launched with the wallpaper.
NOTE: For environment image in the VR device, the image file should be 360 degrees and hosted in /sdcard.
Using File Transfer and Run Script Jobs:
1. Navigate to Jobs > Android VR > File Transfer > Add.
2. In the File Transfer job prompt, select a file path or enter the file URL of the wallpaper.
3. Select the Device Path for the wallpaper file to save.
4. Go to SureMDM Home and apply the job to the device.
Wallpaper file will be pushed on the VR device.
5. Navigate to Jobs > Android VR > Run Script.
6. Create a Job Name using below-mentioned script and click Save.
!#suremdm
setWallpaper(filepath)
7. Go to SureMDM Home and apply the job to the device.
Wallpaper will be set on the SureMDM VR Home Screen.
Remove the Wallpaper from SureMDM Nix VR
1. Navigate to Jobs > Android VR > Run Script.
2. Create a Job Name using below-mentioned script and click.
!#suremdm
removeWallpaper
3. Go to SureMDM Home and apply the job to the device.
Wallpaper will be removed from SureMDM Nix VR Home Screen.
Show/Hide Nix on Oculus VR devices
There are two ways through which IT pros can show/hide Nix on SureMDM Nix VR:
- Using Run Script Job
- Using Nix Settings File
Using Run Script Job
1. Navigate to Jobs > Android VR > Run Script.
2. Create a Job Name by using below-mentioned script and click.
!#suremdm
showNix(true)
NOTE: Use False to hide the Nix on the device.
3. Go to SureMDM Home and apply the job to the device.
Using Nix Settings File
1. Add the following tag in the Nix settings file and save it.
NOTE: Use False to hide the Nix on the device.
2. Push new Nix setting file to the device using File Transfer Job and reboot the device.
Reboot the Oculus VR devices
1. Navigate to Jobs > Android VR > Run Script.
2. Create a Job Name using below-mentioned script and click.
!#suremdm
reboot
3. Go to SureMDM Home and apply the job to the device.
The device will restart.
Remote Support and Wi-Fi features are also available which are similar to the Android platform.