Emulator vs Simulator in Mobile App Testing: Which One Do You Really Need?
Mar 02, 2026 | Harshita B
Last Updated: Mar 16, 2026

We’ve all been there. You’ve spent weeks perfecting your code. The UI is sleek, the logic is sound, and it runs perfectly on your desktop environment. But then comes the moment of truth: Testing. Suddenly, you're staring at a dropdown menu of virtual devices. Do you pick the iOS Simulator? The Android Emulator? Or do you grab that dusty Pixel phone from the drawer? Choosing the wrong one early on can lead to "ghost bugs" that disappear in dev but crash in production.
Let's clear the fog.
What are Emulators and Simulators?
Before we dive into the "versus," let's define these terms.
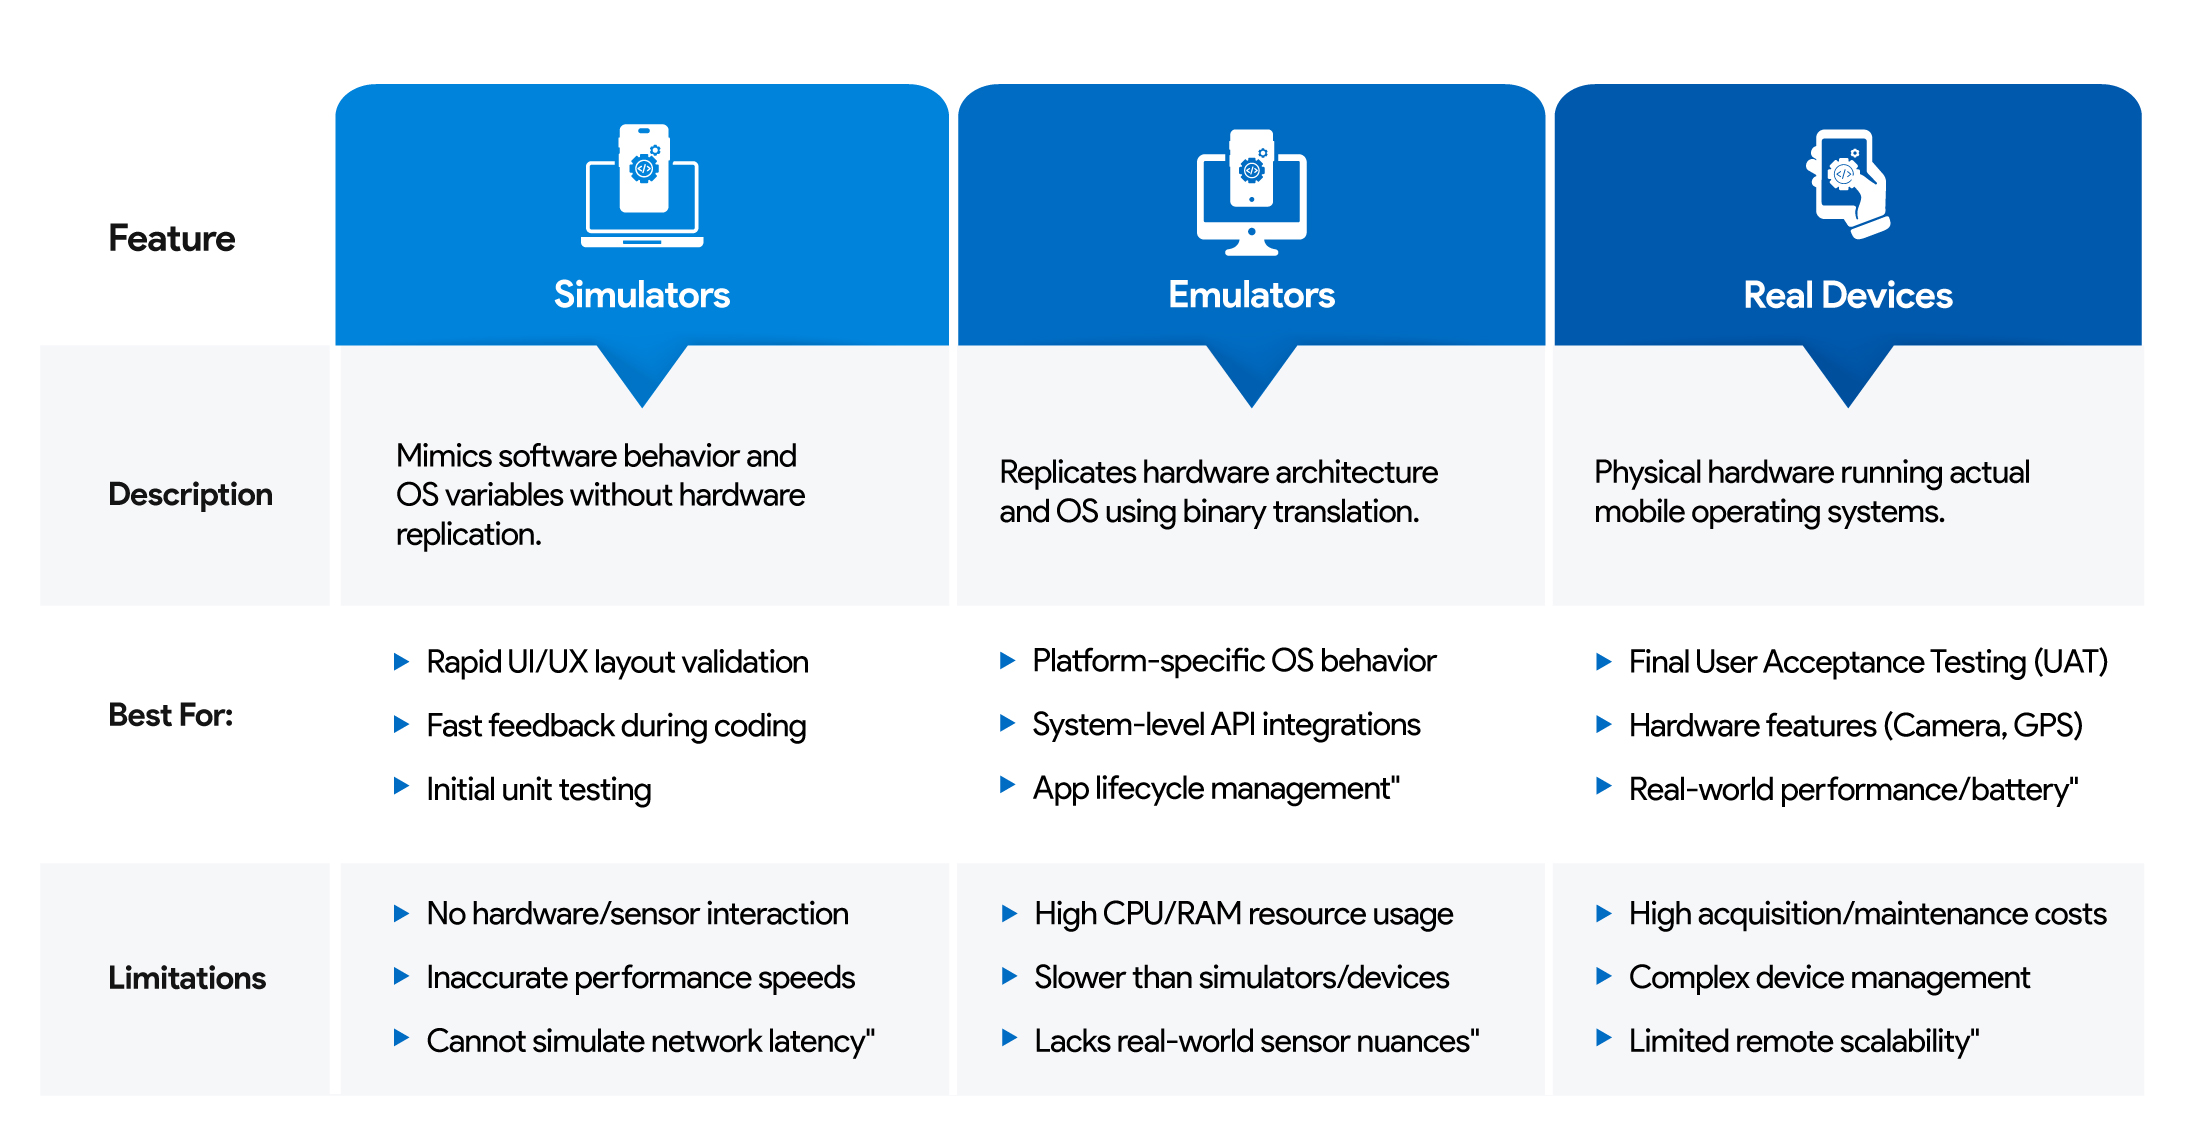
- Emulator: An Emulator is a "hardware mimic." It replicates the target device's hardware architecture (like the CPU) and the software. If you're testing an Android app on a PC, the emulator translates the app's ARM instructions to your computer's x86 instructions.
- Simulator: A Simulator is a "software mimic." It creates an environment that behaves like the device's OS but doesn't care about the hardware underneath. Think of the iOS Simulator on a Mac; it uses the Mac’s underlying hardware to run a version of iOS.
Emulator vs. Simulator: A Technical Comparison
| Feature | Emulator (e.g., Android Emulator) | Simulator (e.g., iOS Simulator) |
| Replication Scope | Full Hardware (ISA) + Software (OS) | Software (OS) behavior only |
| Underlying Tech | Binary Translation (e.g., ARM to x86) | Direct execution on host machine's hardware |
| Performance | Slower (due to translation overhead, higher CPU/RAM usage) | Faster (native execution, less overhead) |
| Accuracy | High (mimics low-level system calls, CPU behavior) | Moderate (focus on UI/UX, less on hardware interaction) |
| OS Compatibility | More adaptable (can emulate different Android versions/device types) | Typically tied to host OS (e.g., iOS Sim on macOS) |
| Best For | Android App Testing, deep system-level integration, specific hardware driver behavior | iOS App Testing, UI/UX flows, rapid iteration |
| Limitations | Resource-intensive, potential performance bottlenecks | Cannot test hardware-specific features, network latency, actual battery life |
Testing Apps on a Simulator vs. Emulator vs. Real Device: When to Choose Each Scenario
Now, let's look at the practical application of each testing method in your app development lifecycle.
1. Initial Development & Rapid Iteration: Leveraging Simulators
During the early stages of development, when you're frequently changing UI elements, implementing new features, or fixing basic logic, simulators are your best friend.
When to Choose:
- Unit and Integration Testing: Quickly verify individual components or how modules interact.
- UI/UX Layout Validation: Check screen rendering, element alignment, and basic navigation.
- Fast Feedback Cycles: Their speed allows for immediate visual feedback after code changes, crucial for agile development.
Limitations:
- No Hardware Interaction: Features relying on GPS, camera, gyroscope, NFC, or push notifications cannot be accurately tested.
- Performance Discrepancies: The app's performance on a simulator (running on your powerful dev machine) will rarely reflect real-world device performance.
- Network Conditions: Cannot simulate varying network speeds, signal drops, or latency.
- Limited Interrupt Testing: Unable to test how your app handles real-time interruptions like phone calls or SMS.
2. System-Level Checks & Deeper Component Interaction: Use Emulators
When your app starts interacting more closely with the device's operating system or requires a closer approximation of hardware behavior, emulators step in.
When to Choose:
- Platform-Specific Behavior: Testing how your Android app interacts with different Android versions or OS services.
- API Integration: Validating integrations with platform-specific APIs (e.g., Android intents).
- App Lifecycle Management: Observing how your app behaves when moved to the background, foreground, or killed by the OS.
- Basic Hardware Emulation: Emulators can often simulate things like battery levels, incoming calls (though not actual calls), or network types (e.g., 3G, LTE) with greater accuracy than simulators.
Limitations:
- Resource Intensiveness: Emulators demand more CPU and RAM from your development machine, potentially slowing down your workflow.
- Performance Overhead: The binary translation process introduces latency, making them slower than real devices or simulators.
- Still Not Real: While better than simulators, they still can't perfectly mimic every real device nuance, especially concerning actual sensor data, thermal throttling, or real-world network instability.
3. Real-World Validation & User Experience: Prioritize Real Devices
This is where your app faces the ultimate test. No emulator or simulator can fully replicate the myriad of real-world conditions, user behaviors, and device specificities that impact your app's performance and user experience.
When to Choose:
- User Acceptance Testing (UAT): Crucial for ensuring the app meets user expectations in a production environment.
- Performance & Battery Life Analysis: Accurate measurement of frame rates, responsiveness, resource consumption, and battery drain under actual usage.
- Hardware-Specific Feature Testing: Essential for camera, GPS accuracy, NFC payments, biometric authentication, push notifications, and sensor data.
- Network & Connectivity Testing: Evaluating app behavior across fluctuating Wi-Fi, 2G, 3G, 4G, and 5G connections, including offline scenarios.
- Interrupt Handling: Verifying graceful handling of real phone calls, SMS messages, low battery warnings, or app backgrounding.
- Device Fragmentation & OS Variations: Testing across a diverse range of screen sizes, resolutions, manufacturer skins (e.g., Samsung One UI, Xiaomi MIUI), and OS versions to catch visual glitches or functional bugs.
- Accessibility Testing: Ensuring your app is usable for all, including those with disabilities, on actual devices with accessibility features enabled.
- Stress & Load Testing: Pushing the app's limits under high usage scenarios.
Limitations:
- High Acquisition & Maintenance Costs: Building and maintaining a comprehensive device lab can be expensive and logistically challenging.
- Device Management Overhead: Keeping devices updated, charged, and available for testers.
- Scalability Challenges: Expanding testing to cover a vast array of devices and OS combinations in-house is difficult.
Here's a comparison to help you decide when to use what:
The Optimal Testing Strategy: A Hybrid Approach is Key
For robust mobile app quality assurance, relying on a single testing method is insufficient. The most effective strategy involves a thoughtful, layered approach:
- Start with Simulators: Use these for rapid UI checks and unit testing during the initial coding phase. They provide the fastest feedback loop.
- Scale with Emulators: Transition here for system-level testing and to validate platform-specific behaviors or API integrations.
- Finalize on Real Devices: This is the critical final gate. Use real hardware to guarantee performance, battery efficiency, and a flawless UX in real-world conditions.
This blended workflow allows you to catch bugs early and cheaply in virtual environments while ensuring your app is battle-tested for the real world.
Streamlining Real Device Testing with AstroFarm
While virtual tools serve their purpose, real device testing is the non-negotiable final gate for production. AstroFarm eliminates the trade-off between limited virtual tools and expensive physical setups by transforming your local hardware into a secure Private Device Cloud.
By connecting your office's devices—including rugged hardware and accessories—to a central hub, your QA team can access real machines 24/7 via any browser, regardless of their time zone. AstroFarm removes traditional hardware bottlenecks, offering centralized management and total "Real Device" accuracy with the scalability of the cloud.
Stop guessing how your app will perform
in the real world. Get real device testing
with AstroFarm.
Subscribe for our free newsletter

Exclusive News and Updates on Enterprise Mobility!
